
Martin Godfrey wrote the first version of this list in 2006 to answer the question every woodworker asks: what does a WoodRat actually do that a router table or a dovetail jig doesn't? We've brought it up to date for the WR900. There are 99 here, and there are plenty more.
When you look at a WoodRat you see no stops, fingers or tines telling the router where to go. At first that looks like a disadvantage. In fact it's the whole point: nothing dictates the size or position of your joints, so you decide.
Martin Godfrey, inventor of the WoodRat
One machine, every joint
- It controls the router on three axes: left and right, forward and back, and up and down. A router table works on one.
- One machine does jobs that would otherwise need several machines, a stack of jigs or a lot of handwork. That saves space and money you can put into other good tools.
- It cuts dovetails, mortise and tenon, housings, sliding dovetails, box joints, bridle joints and much more, all on the same machine.
- It works with any plunge router you already own.
- It works with any router bit in the catalogue, not just special cutters.
- Different jobs need no expensive add-on templates. You decide how big the joints are and where they go.
- There is no fixed comb or finger template to buy, store or wear out.
- Most new parts still fit and work with older WoodRats, so nothing you buy is made obsolete.
Space and setting up
- It hangs on the wall. There's no stand and no heavy cast-iron base.
- It works about six inches from the wall, so you can fit storage, power and dust extraction around it.
- No workshop is too small for a WoodRat.
- It takes up no bench space, so your bench stays clear for marking out and assembly.
- You can clear out jigs and machines you no longer need and gain even more room.
- The router fixes to the router plate with two screws, centred using its own sub-base.
- Changing from dovetailing to tenoning takes about a minute.
- Setting the router against the fence takes seconds, and the work locks in place instantly.
- Fixed to a strong board held in a vice, it can go out to site.
Safe and easy on the router
- The router is the right way up, and the cutting happens safely below the plates.
- If a cut goes wrong, the work tends to fall away from the bit rather than into it.
- A support board or a brush used as a featherboard can be clamped in place in seconds, so your hands are always protected.
- The sliding plates carry the router's weight, so even a heavy router can be used all day without strain.
- Because the router sits on plates, it can't tip into the work.
- The cut is gentle and controlled, which is easier on the router's bearings.
- Dust doesn't fall into the router motor, so the router lasts longer.
- Chips are thrown away from you, not into your eyes.
- Dust extraction starts right behind the cut, where it does most good.
- No plastic dust hood is needed, so you can see what you're doing.
See the cut, cut to a line
- Unlike on a router table, the wood doesn't hide the bit. You watch it cut.
- You can line the bit up with a pencil line and dry-run the pass before switching on.
- Mark the wood, lock it in, and cut to your line, just as you would with a tenon saw.
- The router cuts both walls and the bottom of a socket in one pass, square and clean.
- The machine is anodised grey, so fine pencil marks show clearly and rub off cleanly.
- Fix any rule you like, metric or imperial, and run a shop-made cursor past it. A scratch on acrylic is as accurate as you'll ever need.
- You can stick drawings or temporary templates on the machine and work to them.
- Setting the cutting depth is easy because the router's controls are in front of you, not upside down under a table.
- Zero the bit on the work, set the depth with a gauging piece, drop the bit and cut. No wind-up depth screws.
Accurate and repeatable
- The cable drive moves the work left and right with great precision.
- There's no backlash, so when you let go of the handle the work stays exactly where it is.
- When the cutter meets the wood, the work doesn't move.
- Take a piece out, put it back, and it goes to exactly the same place. That makes repeat work easy.
- The router can be set forward or back with fine adjustment and fixed exactly where you want it. On a router table that's an expensive extra; on a WoodRat it's standard.
- With the fences square, every joint comes out square, so the whole job goes together straight and true.
- Keep a record of your settings and you can repeat a job exactly, even a year later.
An end to tearout
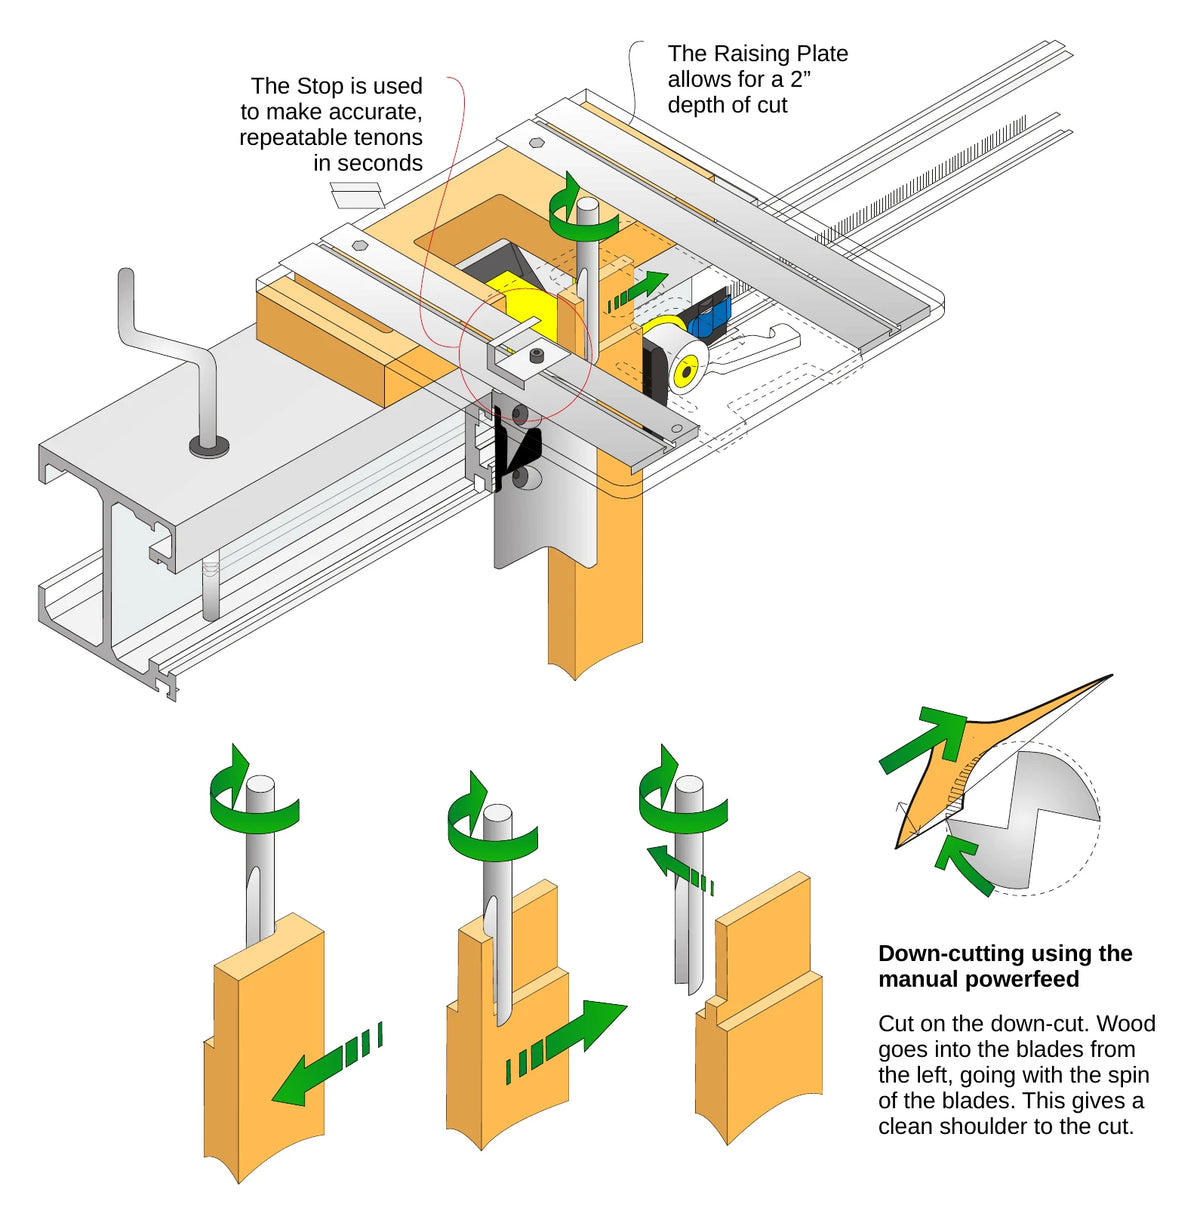
- The built-in manual powerfeed holds the wood firmly and drives it into the bit.
- That means you can cut in either direction, including down-cutting (climb cutting), for a clean shoulder every time.
- You can shoot the end of a board up to 760 mm (30 in) wide, trimming it square and clean ready for jointing.
- Most joints made across the grain on a router table tear out. On a WoodRat they come out clean.
Easy to learn, impossible to outgrow
- Most joints are simple: put the wood in and cut it.
- The main thing to learn is to stop expecting it to behave like a router table or a dovetail jig.
- The printed manual comes with every machine and covers every technique step by step.
- Some techniques will still challenge an experienced woodworker. You'll never reach the end of what it can do.
- The cam locks hold the work in a second.
- The work can be held flat, on edge, at 90 degrees, or at an angle, flat or on edge.
- If a piece is too small or awkward for the cam locks, a simple shop-made carrier holds it.
- Hands-on training days are available in the North and South of England.
Router table work, the right way up
- Feed the wood by hand under the plate, just as on a router table, for profiles, grooves, rebates and mouldings.
- Use matched cutter sets for tongue and groove, or cope-and-stick sets for cabinet doors.
- Start and stop a groove exactly where you want without setting stops, so a box-bottom groove never shows on the outside.
- Uniquely, it can work on the end of a long board, because the board is clamped to the sliding bar and powerfed into the bit.
- It combines the best of an overhead router (you can see the cut) and a router table (a constant depth of cut).
- With no machine bed in the way, you can work on very large or awkward pieces.
- Long boards can be supported on rollers, so almost any length can be profiled.
- A hardwood pin under the cutter turns it into a pin router for shapes cut from a template.
- Thin acrylic sheets clamped under the plate let you work safely on tiny parts.
Housings, dados and sliding dovetails
- Clamp a board under the base plate and cut a housing (dado) across it. That's the start of shelving, partitions, grilles and halving joints.
- You can cut across the end of a long shelf side, which is impossible on a router table.
- Swap to a dovetail bit and the same cut becomes a sliding dovetail housing, placed exactly where you can see it.
- Sliding dovetail tenons are made in two passes, so both faces are parallel even if the board is slightly bowed.
- A sliding dovetail is as quick as a housing, but much stronger, because it can't pull out.
- Louvres and grilles are quick to make in batches.
Tenons
- Almost every kind of tenon is possible, and most are easy.
- A stop in the guide rails sets the length of the cut, and a simple block sets the tenon thickness, so every tenon matches.
- Tenons come out square-cornered, so a classic haunched tenon is three easy cuts.
- Twin tenons, double tenons and double twins are all straightforward.
- Tenons can be up to 760 mm (30 in) wide, or as small as a matchstick.
- Cuts up to 50 mm (2 in) deep, and you can double that by cutting from the other face.
- Bridle joints and mitred bridle joints use the same method.
Mortising and drilling
- Fit a PlungeBar and you plunge the router with one hand, leaving the other free. It turns the WoodRat into a mortiser.
- The MR4 mortise rail holds work flat and tracks it through the bit.
- Several rails or stiles can be mortised at once, all in exactly the same position.
- You can see your marking-out lines as you cut, and you don't have to reposition the work for each mortise.
- Groove each piece for its panel on the same set-up, perfectly in line.
- Mortises can go 50 mm (2 in) deep, and 100 mm (4 in) or more by turning the piece.
- Use it as a precise drill stand, with the work moved left and right and the router forward and back to exact positions.
- Set the mortise rail leaning forward to cut raised and fielded panels with an ordinary straight bit.
Dovetails
- The WoodRat started life as a dovetailer, and no other system makes such a range of dovetails in so many sizes.
- No templates and no guide bushes. Nothing restricts what you can see or what you can cut.
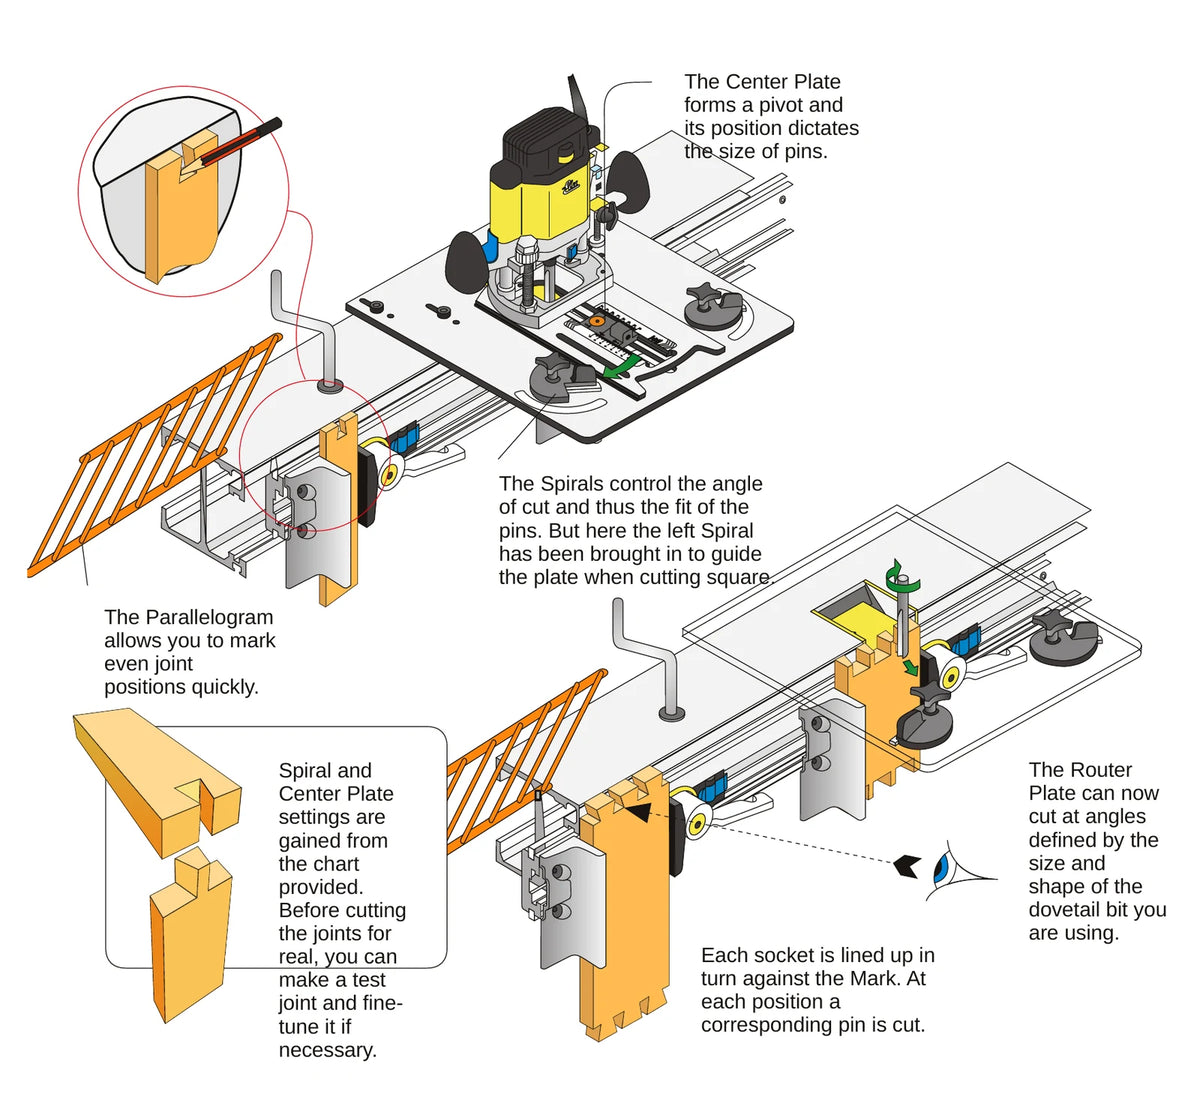
- The parallelogram gives even spacing across any board the machine takes, with no calculation.
- Or space your dovetails however you like, evenly or not, with just a sharp pencil.
- With no fingers in the way, pins can be closer than 25 mm (1 in) apart. Most dovetail jigs can't do this.
- Dovetails from 8 mm to 50 mm (2 in) deep, in boards up to 760 mm (30 in) wide, down to less than 13 mm (1/2 in).
- Pins can be made to fit any dovetail bit, of any angle, from any maker.
- The first board you cut becomes the template for the second, so the fit is exact, and you can come back a year later and still cut pins to match.
- Cut all your tail sockets first, then all the pins, without resetting the machine between them.
- The spirals give a very fine adjustment, so you can set the fit of the pins for each kind of wood.
- Half-blind (lapped) drawer dovetails with the fine look of hand-cut work, on drawer sides as thin as you like.
- The Pathfinder adds quick half-blind drawer dovetails when you're making a lot of drawers.
- Secret mitred, double-lapped, angled, end-to-end and decorative inlaid dovetails are all possible.
- Batch cutting: clamp a stack of boards together, or cut the joints in a solid block and slice it, for box joints and dovetails in a fraction of the time.
We could go on. Martin's original list ran to 117, and the most important reason of all is that it's a really enjoyable machine to use.